Getting Started
This page explains how to install SimpleElastix. The process involves compiling the C++ project and linking against a target language from which you would like to use SimpleElastix. SimpleElastix can be linked against Python, Java, R, Ruby, Lua, Tcl and C#.
Compiling On Linux
SimpleElastix includes a script that automatically downloads and installs all dependencies. This is called a ‘SuperBuild’ in CMake terms. We only need CMake, git, and a compiler toolchain to compile the SuperBuild. Once these have been installed (e.g. sudo apt install cmake git build-essential), we use the following commands to download the code and start the build:
$ git clone https://github.com/SuperElastix/SimpleElastix
$ mkdir build
$ cd build
$ cmake ../SimpleElastix/SuperBuild
$ make -j4
Warning
Be careful not to run out of memory during the build. A rule of thumb is that we need 4GB of memory per core. For example, if we compile SimpleElastix with 4 cores (e.g. make -j4) we need a machine with at least 16GB of RAM. The full project takes around an hour to compile on a quad-core machine.
SimpleElastix will be compiled for languages that it can automatically detect. Target language dependencies need to be installed before you start compile the SuperBuild. The relevant apt packages are
python python-dev monodevelop r-base r-base-dev ruby ruby-dev tcl tcl-dev tk tk-dev
The language packages will be built in the ${BUILD_DIRECTORY}/SimpleITK-build/Wrapping directory. We then have to run language-specific install scripts.
Follow the steps below to install SimpleElastix when compilation has finished.
# Python
To install the python module onto your system, navigate to
${BUILD_DIRECTORY}/SimpleITK-build/Wrapping/Python
and run the following command:
$ sudo python Packaging/setup.py install
This will install the SimpleElastix which we can then import into our own scripts. If we want to install SimpleElastix into a virtual environment, activate the virtual environment on beforehand and omit sudo. If you don’t know what a virtual environment is, don’t worry about it, it is entirely optional.
# Java TODO: Pull request welcome.
# R TODO: Pull request welcome.
# C# TODO: Pull request welcome.
# C++ TODO: Pull request welcome.
# Ruby TODO: Pull request welcome.
# Lua TODO: Pull request welcome.
Compiling On Mac OS X
The Mac OS X compilation procedure is identical to that of Linux, so simply follow the Linux installation steps above to compile SimpleElastix. We need to have CMake git and a compiler installed. We can check for a working compiler by opening the OS X terminal and run make. OS X will know if the Xcode Command Line Tools is missing and prompt you to install them if this is the case.
Mac OS X comes with Python and Tcl preinstalled but other target-language dependencies need to be installed seperately. This can be done with Macports or Homebrew.
# Java TODO: Pull request welcome.
# R TODO: Pull request welcome.
# C# TODO: Pull request welcome.
# C++ TODO: Pull request welcome.
# Ruby TODO: Pull request welcome.
# Lua TODO: Pull request welcome.
Compiling On Windows
SimpleElastix includes a script that automatically downloads and install all dependencies. This is called a ‘SuperBuild’ in CMake terms. The only things needed to compile the SuperBuild is CMake, git and a compiler toolchain. Here, we use the compiler that comes the free Visual Studio Community 2017 package.
Using Visual Studio
We will use CMake to generate build files and the Visual Studio compiler to compile the project.
- Download CMake, git and code, and setup directories.
- Download and install CMake GUI.
git clone https://github.com/kaspermarstal/SimpleElastixinto a source folder of your choice.- Point the CMake source directory to the
SimpleElastix/SuperBuildfolder inside the source directory. - Point the CMake build directory to a clean directory. Note that Visual Studio may complain during the build if the path is longer than 50 characters. Make a build directory with a short name at the root of your harddrive to avoid any issues.
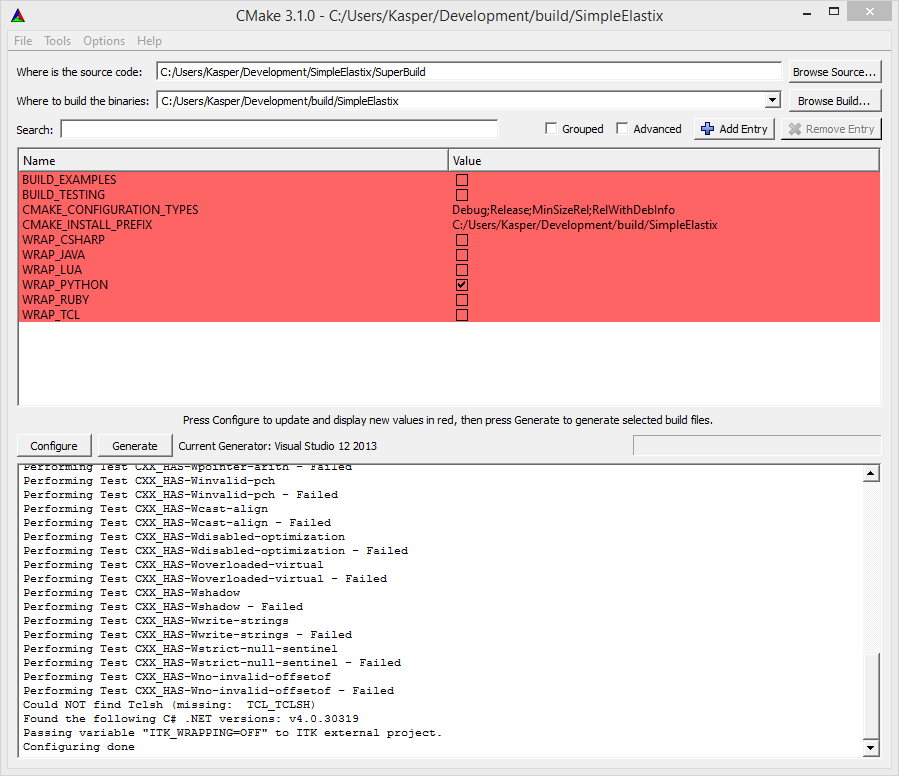
Figure 3: Configure CMake.
- Select compiler.
- Press configure to bring up the compiler selection window.
- Check whether our target languages are installed as 32-bit or 64-bit. For example, if our Python installation is 64-bit, we will need to build the 64-bit version of SimpleElastix to link it. If at all possible, we choose the 64-bit version since the build may run out of memory on 32-bit platforms.
- Choose a compiler and click next. CMake will find the selected compiler for us if we leave the “Use default native compiler” option checked.
Tip
- If you need a compiler other than the default system option, select “Specify native compilers”. Leave the “Use default native compiler” option checked if you don’t know what this means.
- If CMake complains that a compiler cannot be found, install the free Visual Studio Community Edition .
- If CMake does not pick up our target language, check that it has been installed with development libraries, and check if the paths have been set. For example, to manually configure CMake Python paths, tick “Advanced” and specify
PYTHON_EXECUTABLE,PYTHON_INCLUDE_DIRandPYTHON_LIBRARY. See Troubleshooting section for details.
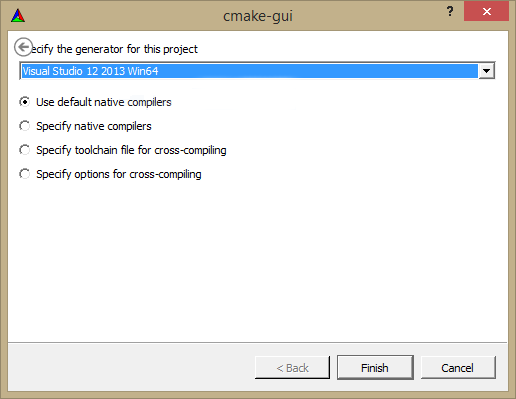
Figure 4: Select compiler.
- Press generate.
- If you are comfortable with the commandline, this is by far the easiest and least error-prone way of compiling the project. Otherwise skip to steps 4 and 5 that uses Visual Studio .
- Open x64 native tools command prompt. On Windows 10, open the stat menu and click on “All Apps”. Find the Visual Studio folder (e.g. “Microsoft Visual Studio 2012”), open it, and click on “Open VS2012 x64 Native Tools Command Prompt.”`w
- Navigate to the build folder specified in CMake.
- Run
msbuild ALL_BUILD.vcxproj /p:Configuration=Release. - Done. Ignore steps 4 and 5.
Open Visual Studio, select File -> Open Project/Solution -> Open and choose
SuperBuildSimpleITKsolution.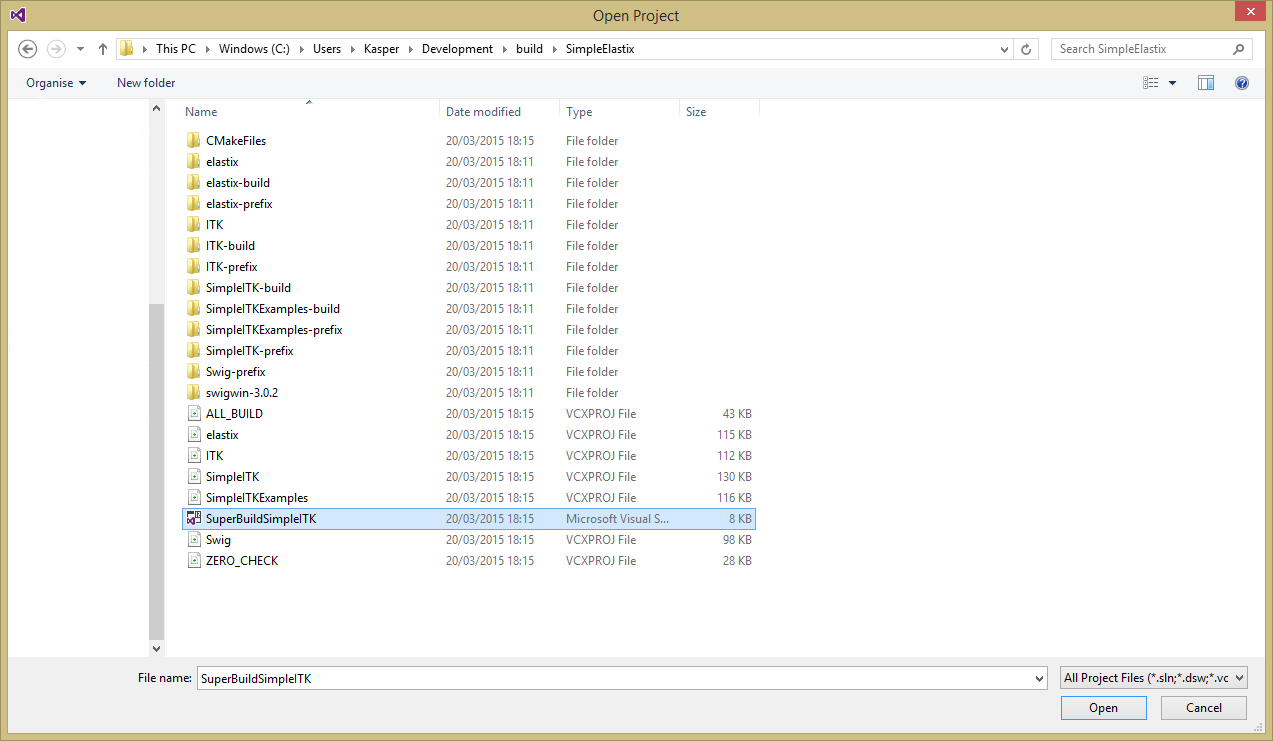
Figure 5: Open the solution in Visual Studio.
Make sure “Release” build type is selected and build the
ALL_BUILDproject. If the “Debug” build type is used instead of “Release” mode, you will experience a significant performance penalty and may not be able to build language packages that are distributed without development binaries.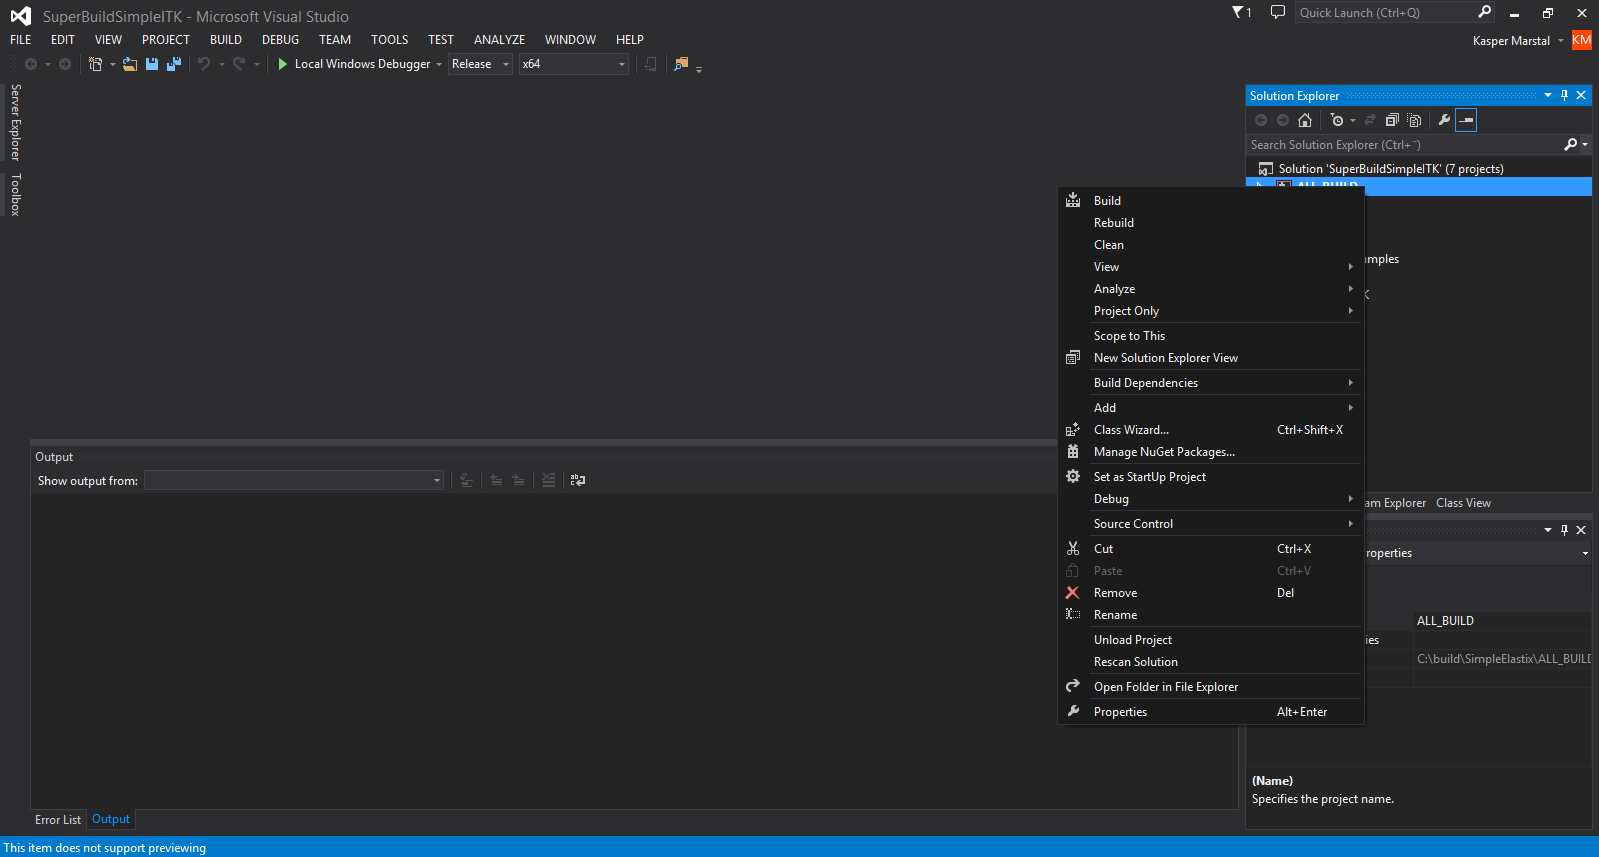
Figure 6: Right-click on
ALL_BUILDand clickBuild.
# Python
To install the python module onto your system, navigate to
${BUILD_DIRECTORY}/SimpleITK-build/Wrapping/Python/Packaging
and run the following command:
$ sudo python setup.py install
This will install the SimpleITK python module with SimpleElastix, which can then be imported into scripts like any other python module. If you want to install SimpleElastix into a virtual environment, activate the virtual environment on beforehand and omit sudo. If you don’t know what a virtual environment is, don’t worry about it, it is entirely optional.
# Java TODO: Pull request welcome.
# R TODO: Pull request welcome.
# C# TODO: Pull request welcome.
# C++ TODO: Pull request welcome.
# Ruby TODO: Pull request welcome.
# Lua TODO: Pull request welcome.
Using the command line
SimpleElastix can also be compiled via the Windows shell. You will use CMake to generate build files and the msbuild.exe program to compile the project.
- Download CMake, git and code, and setup directories.
- Download and install CMake GUI. Be sure to select Add CMake to the system PATH option.
git clone https://github.com/kaspermarstal/SimpleElastixinto a source folder of your choice. You can install GitHub Desktop and use the accompanying command line tool with git automatically added to its path.- Make a new directory named build and cd into it by typing cd build. Here we will assume that the build directory and the source directory is in the same folder.
- Compile the project.
- Open “Developer Command Prompt for VS2015” (or equivalent depending on your version of Visual Studio)
- Run cmake ../SimpleElastix/SuperBuild.
- Run msbuild /p:configuration=release ALL_BUILD.vcxproj.
- Enable x64 bit build (Optional).
- Prior to running the cmake command in step 2, navigate to C:/Program Files (x86)/Microsoft Visual Studio 14.0/VC> (or equivalent depending on your version of Visual Studio) and vcvarsall amd64.
Manually Building On Linux
The following approach allows us to use a locally installed version of ITK and/or elastix.
- Setup the prerequisites
- sudo apt-get install cmake swig monodevelop r-base r-base-dev ruby python python-dev tcl tcl-dev tk tk-dev.
- Install SWIG >= 3.0.5
- Install ITK. Configure CMake using the same approach as above.
- Clone ITK from github.com/InsightSoftwareConsortium/ITK.
- Configure CMake. Set the following CMake variables: BUILD_SHARED_LIBS=OFF, Module_ITKReview=ON, ITK_WRAP_*=OFF.
- Compile ITK. Make sure to note the build settings, e.g. Release x64.
- Build elastix.
- Clone elastix from github.com/SuperElastix/elastix.
- Set ITK_DIR to the location of the ITK build directory
- Configure CMake. Set the CMake variable
BUILD_EXECUTABLEtoOFF. - Set appropriate ELASTIX_IMAGE_2/3/4D_PIXELTYPES and any components that you might require.
- If you are developing your own elastix components, make sure they are properly registered by the elastix build system.
- Compile elastix. Make sure to configure the build settings exactly the same as ITK e.g. Release x64.
- Build SimpleElastix.
- Clone SimpleElastix from github.com/SuperElastix/SimpleElastix.
- Configure CMake. Point
ITK_DIRto the location of the ITK build directory andELASTIX_DIRto the location of the elastix build directory, specifically the src/ directory in it. - Build SimpleElastix. Make sure to configure the build settings exactly the same as ITK and Elastix, e.g. Release x64.
Troubleshooting
I have installed a target language but CMake cannot find it
The language package may be configured incorrectly or the necessary folders may not have been added to your $PATH environment variable during installation. Two solutions are available.
- Solution 1: Add the necessary folders to your
$PATHenvironment variable.
- Linux and Mac OS X: Add
export PATH=${PATH}:/path/to/folderto your$HOME/.bash_profile(or$HOME/.profiledepending on your system) and restart the terminal.- Windows: Go to Control Panel -> System -> Advanced tab -> Environment Variables and add the target language installation directory to the
PATHvariable.
- Solution 2: Set the paths manually in CMake (quick and dirty fix). For example, specify
PYTHON_EXECUTABLE,PYTHON_INCLUDE_DIRandPYTHON_LIBRARYif you wish to build the python package.
- Linux and Mac OS X: Run
$ ccmake .in the build directory and presston your keyboard to see these options.- Windows: Tick “Advanced” in the CMake GUI to see these options.
- You will have to repeat this procedure every time you setup a new build of SimpleElastix, so we recommend that you configure your
$PATHenvironment variable as described in solution 1 above.
If you are still experiencing problems at this point, re-install the language package or consult Google or Stack Overflow.
Visual Studio throws LNK1102 out of memory error even though I selected the 64-bit compiler
While Visual Studio targets 64-bit platforms when we select a 64-bit compiler, the Visual Studio toolchain itself will be 32-bit by default. We may therefore experience an out-of-memory error even though you compile a 64-bit vesion of elastix, especially during the linking stage. There are (at least) two ways we can try switch to a 64-bit toolchain (“try” because these methods work, someimes they don’t).
- Solution 1: Set the environment variable
_IsNativeEnvironment=truein command prompt, then call the Visual Studio executable from command line. For example, in the case of VS2013:start "c:\Program Files (x86)\Microsoft Visual Studio 12.0\Common7\IDE\devenv.exe" c:\SimpleElastix\build\SimpleITK-build\SimpleITK.sln
- Solution 2: In Visual Studio, edit your .vcxproj file and insert the following after the
<Import...Microsoft.Cpp.Defaults>line:<Import Project="$(VCTargetsPath)\Microsoft.Cpp.Default.props" /> <PropertyGroup> <PreferredToolArchitecture>x64</PreferredToolArchitecture> </PropertyGroup>
The SuperBuild throws Server SSL certificate verification failed: certificate has expired during checkout of elastix
- Solution 1: We run
svn info https://svn.bigr.nl/elastix/trunkpublic/in out terminal. It will then prompt us to “(R)eject, accept (t)emporarily or accept (p)ermanently?” the certificate. Hit ‘p’ and then enter. It may then ask us for our SVN username, which iselastixguest, and password, which is alsoelastixguest. Then we restart the build. You may have to change permissions recusively in ~/.subversion/auth. This is done by doing “chmod -R 777 ~/.subversion/auth”. If all else fails, our last port of call will be to delete ~/.subversion/auth/svn.ssl.server and then carry out the steps in Solution 1. The commands noted here are linux-specific.
PCRE (Perl Compatible Regular Expression) build fails on Mac OS X
On recent versions of Mac OS X you may experience the following error when using the SuperBuild:
Performing build step for 'PCRE'
make[3]: *** No targets specified and no makefile found. Stop.
make[2]: *** [PCRE-prefix/src/PCRE-stamp/PCRE-build] Error 2
make[1]: *** [CMakeFiles/PCRE.dir/all] Error 2
make: *** [all] Error 2
This happens during the SWIG build. We can work around this issue by forcing CMake to use clang. Add the following flags to the CMake configure command and run it in a clean directory:
cmake -DCMAKE_CXX_COMPILER:STRING=/usr/bin/clang++ -DCMAKE_C_COMPILER:STRING=/usr/bin/clang path/to/SimpleElastix/SuperBuild
Ruby build fails on Mac OS X
The Ruby virtual machine cannot accomodate spaces in paths. If you see a path that contains spaces like /Applications/Apple Dev Tools/Xcode.app/Contents/Developer, re-install Xcode Command Line Tools to a place with no spaces in the path.
I get compilation errors like elastixlib.h' and 'transformixlib.h' file not found
This error may stem from a space in the path of the build directory. For example, if we are building SimplElastix in /Users/kasper/folder name/build we should rename it to /Users/kasper/folder_name/build or similar.
SimpleElastix takes a long time to build!
The full build take 2+ hours to build on a standard machine. We can speed up compilation by deselecting Examples, Testing and any wrapped languages we don’t need. Other than that there is not much we can do. SimpleITK has to compile all filters (including elastix) for all pixel types in order to support runtime selection of the correct template parameters.
I am unable to assign a parameter to a parameter map in a parameter map list
This is a known issue which is possibly related to the SWIG-generated code. If you have a solution please make a pull request!
Contribute
If you are experiencing a problem that is not describes on this page, you are very welcome to open an issue on Github and we will do our best to help you out. Likewise, if you have found a solution to a problem that is not described on this page, we hope you will open a pull request on Github and help fix the problem for everyone.